auto-imports.. Composables , types, emit 만들기

components/. composables/, utils/ 하위의 파일은 모두 자동으로 임폴트 된다.
SEO최적화에 유리할 수 있게 링크 이동 할 때에는 router를 이용하는 것이 옳다.
        <RouterLink v-slot="{ navigate }" :to="`/coures/${courseSlug}`">
          <CourseCard
            :title="title"
            :subtitle="subtitle"
            :thumbnail="thumbnail"
          />
        </RouterLink>
하지만 nuxt에서는 nuxtlink를 이용해서 링크 이동을 한다.
        <NuxtLink custom :to="`/course/${courseSlug}`">
          <CourseCard
            :title="title"
            :subtitle="subtitle"
            :thumbnail="thumbnail"
          />
        </NuxtLink>
참고로 NuxtLink에 custom 속성을 넣으면 a태그로 만들어지지않고 div가 된다. (RouterLink 도 동일) 페이지 이동을 위해서 navigate를 달아준다.
      >
        <NuxtLink v-slot="{ navigate }" custom :to="`/course/${courseSlug}`">
          <CourseCard
            :title="title"
            :subtitle="subtitle"
            :thumbnail="thumbnail"
            @click="navigate"
          />
        </NuxtLink>
v-slot="navigate"를 넣어주고 하위 컴포넌트에도 클릭이벤트로 넣어준다.
Composables 의 문법은 기본적으로 이렇다.
course 상세
export const useCourse = (courseSlug: string) => {
  const { courses } = useCourses();
  const course = courses.find(
    (course: any) => course.courseSlug === courseSlug,
  );

  return { course };
};
:string 부분은 타입을 명시해 준 것이다. 타입스크립트는 강력한 정적타입 언어이기 때문에 변수나 매개변수의 타입을 명시적으로 지정해주어야 한다.
course 리스트
import courses from './coursesData';

export const useCourses = () => {
  return { courses };
};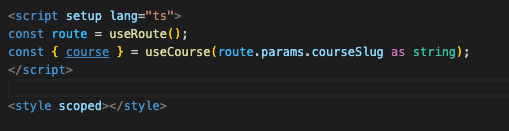
router의 파라미터값을 넣을 때 오류가 났었는데, 그 이유는 파라미터의 경우 배열로 올 수도 있기 때문이다. 이렇게 as string을 붙여 타입을 지정해 주거나
컴포서블에서
export const useCourse = (courseSlug: string | string[]) => {
  const { courses } = useCourses();
  const course = courses.find(
    (course: any) => course.courseSlug === courseSlug,
  );

  return { course };
};
2개의 타입을 몇시해주면 된다. 하지만 나는 string으로 받는 데이터가 필요하기 때문에 as string을 붙여 해결한다.,
3. types 만들기
루트에 types 폴더를 만들어준다.

export interface Course {
  title: string;
  subtitle: string;
  courseSlug: string;
  content: string;
  thumbnail: string;
  video: string;
  rating: number;
  reviewsCount: number;
  studentCount: number;
  reviewsUrl: string;
  inflearnUrl: string;
  gymcodingUrl: string;
}
Course 라는 인터페이스를 만들어준다.
데이터를 뿌리는 순서를 생각해보자면
1. 컴포서블은 데이터를 가져오는 역할을 한다.
+ types에서 인터페이스를 만들어(스프링의 dto 역할) 자료에 꼭 맞게 넣어준다.
3. 컴포서블에서 use~~ 를 만들어 준다. (데이터 가공 역할도 함)
4. pages에서 원하는 데이터를 프롭스 안에 use~~를 이용하여 가져온 뒤 뿌려준다.

이렇게 타입 임폴트시에 ~로 시작하는데 이것은
https://nuxt.com/docs/api/nuxt-config
Nuxt Configuration
Discover all the options you can use in your nuxt.config.ts file.
nuxt.com
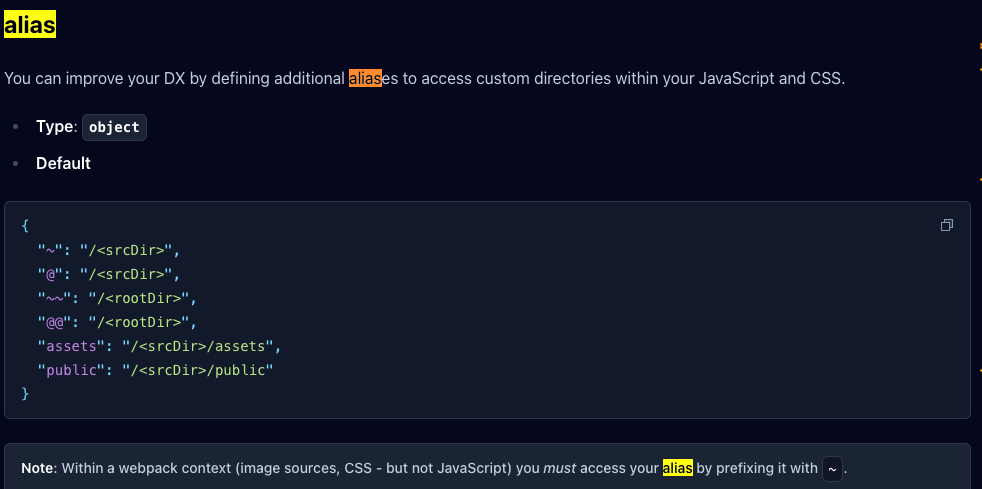
공식 문서상 이렇게 잡혀있다.
위에 잡은 type에 맞게
coursesData.ts 에서 타입지정
import type { Course } from '~/types/course';

const courses: Course[] = [
  {
useCourses.ts에서 타입지정
import courses from './coursesData';
import type { Course } from '~/types/course';

interface CoursesReturn {
  courses: Course[];
}

export const useCourses = (): CoursesReturn => {
  return { courses };
};

다음 처럼 리턴 타입은 CourseReturn으로 지정했음에도 오류가 난다면, 위의 함수에서 courses.find로 인해 찾은 값이 기에 그렇다. undefined일 수 있기 때문임.
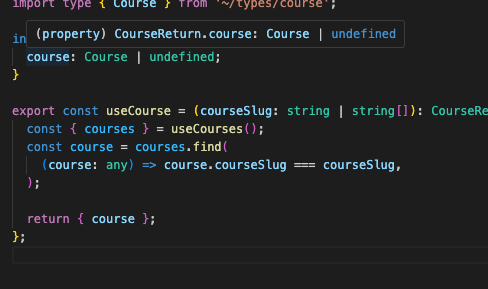
이렇게 undefined로 타입지정을 추가하거나
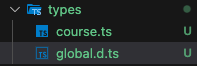
types/global.d.ts 파일을 생성해서
export {};

declare global {
  type Maybe<T> = T | null | undefined;
}
이렇게 정의해두면 자동으로 전역에 해당 설정이 퍼지게 된다.
T는 제네릭으로 내가 만약 위처럼 Course를 썻다면 Course가 저 자리로 가게된다.
사용방식
import type { Course } from '~/types/course';

interface CourseReturn {
  course: Maybe<Course>; //Course | null | undefined
}

export const useCourse = (courseSlug: string | string[]): CourseReturn => {
  const { courses } = useCourses();
  const course = courses.find(
    (course: any) => course.courseSlug === courseSlug,
  );

  return { course };
};
+ 추가로 컴포서블에서 데이터를 가공해서 다른모양으로 리턴을 하려고 하는데,
import coursesData from './coursesData';
import type { CourseWithPath } from '~/types/course';

interface CoursesReturn {
  courses: CourseWithPath[];
}

export const useCourses = (): CoursesReturn => {
  const courses = coursesData.map((item) => ({
    ...item,
    rating: item.rating.toFixed(1), // 5.0
    reviewsCount: item.reviewsCount.toLocaleString(), // 1000 - >1,000
    studentCount: item.studentCount.toLocaleString(), // 12345 -> 12,345
    path: `
    /course/${item.courseSlug}`,
  }));
  return { courses };
};
숫자들의 형식을 바꿔준 뒤에 리턴을 해주려고 한다. 새로운 path라는 데이터도 추가해줬다. type을 바꿔줘야하는데
export interface Course {
  title: string;
  subtitle: string;
  courseSlug: string;
  content: string;
  thumbnail: string;
  video: string;
  rating: number;
  reviewsCount: number;
  studentCount: number;
  reviewsUrl: string;
  inflearnUrl: string;
  gymcodingUrl: string;
}

export interface CourseWithPath {
  title: string;
  subtitle: string;
  courseSlug: string;
  content: string;
  thumbnail: string;
  video: string;
  rating: string;
  reviewsCount: string;
  studentCount: string;
  reviewsUrl: string;
  inflearnUrl: string;
  gymcodingUrl: string;
  path: string;
}
이렇게 데이터를 불러올 때와 뿌려줄 때를 각기 다르게 만들어 주었따.
혹은
type NewType = Omit<Course, 'rating' | 'reviewsCount' | 'studentCount'>;
// 3개를 제외한 새로운 타입을 만들다
export interface CourseWithPath extends NewType {
  path: string;
  rating: string;
  reviewsCount: string;
  studentCount: string;
}
이렇게 사용도 가능하다.
newType을 어차피 한곳에 쓰면
export interface CourseWithPath
  extends Omit<Course, 'rating' | 'reviewsCount' | 'studentCount'> {
  path: string;
  rating: string;
  reviewsCount: string;
  studentCount: string;
}
이렇게 넣어도됌
Emit 로 바뀌었는데.
<script setup lang="ts">
// runtime
// 런타임
const emit = defineEmits(['change', 'update'])

// type-based
// 타입기반
const emit = defineEmits<{
  (e: 'change', id: number): void
  (e: 'update', value: string): void
}>()

//3.3+ :대체 더 간결한 문법
defineEmits<{
  change: [id:number];
  update: [value:string];
}>();
<script setup lang="ts">
interface Props {
thumbnail: string;
title: string;
subtitle: string;
}
defineProps<Props>();
// defineProps({
// thumbnail: {
// type: String,
// default: '',
// },
// title: { type: String, default: '' },
// subtitle: String,
// });props도 이렇게 간결하게 가능하다.